
VISSIM - Public Transport Stops with Pedestrians
Introduction
Welcome to the latest Modelling Group blog post.
For this post, we’re going to talk through how to set up a public transport stop and use pedestrians (as opposed to a fixed dwell time distributions, which emulate the average effect of pedestrians) who board and alight and thus determine the dwell time of the bus.
We’ll talk through a simple, worked example and provide tips and elements to look out for at each stage.
Step 1: Add the Road Elements
First of all, draw a link and then add a PT stop and PT line (as shown in Figure 1).
When adding the PT line, ensure that you add departure times and an associated bus occupancy (see Figure 2).

Figure 1 – Road Elements Added
Step 2: Add the Pedestrian Elements
The next step is to add all of the pedestrian elements to guide pedestrians to the bus stop.
Pedestrian Areas
Four pedestrian areas are required to model the bus stop, which include:
Area 1 – the Walkable area controlling everywhere the pedestrians can go
Area 2 – the Entry area where pedestrians are generated
Area 3 – the Waiting area where pedestrians gather to wait for the bus
Area 4 – the Platform where pedestrians walk to board the bus.

Figure 2 – Configuration of Public Transport Line
Figure 3 shows the set-up of Areas 1, 2 & 3. A small area is included for pedestrians to enter the model and the Waiting Area is assumed to be the space in and around a bus shelter where people would wait and queue.

Figure 3 – Addition of Walking Areas 1, 2 & 3
For the Waiting area, this needs to be configured to be a waiting area and assigned to the associated public transport stop. In this example, the configuration is shown in Figure 4.

Figure 4 – Configuration of Waiting Area to be used by Public Transport Line
The easiest way to create the Platform area is to press Ctrl + Right Click* on the bus stop to open the context menu, and then choose the option ‘add platform edge left’ (as shown in Figure 5).

Figure 5 – Context Menu to add Platform Edge
This automatically creates the Platform area, as shown in Figure 6.
*Or simply Right Click (it depends on your Right Click behaviour – go to: Edit – User Preferences – GUI – Network Editor to check which one you use).
Pedestrian Inputs & Routes
A pedestrian input is required to be added to generate the people in the model. This input is added to the Entry area (Area 1).
Note that the pedestrian volume is identified as Pedestrians/Hr. A high volume (1,000 peds/hr) has been assigned in this example to show the bus stop in action. Ideally, the volume inputs should be broken down into more suitable time periods and be based on actual count data.

Figure 6 – Automatically Generated Platform Edge
Two static pedestrian routes are required to be added:
Route 1 – From the Entry Area to the Waiting Area (for people boarding the bus)
Route 2 – From the Platform Area to the Entry Area (for people alighting the bus)
The routing set-up is shown in Figure 7.
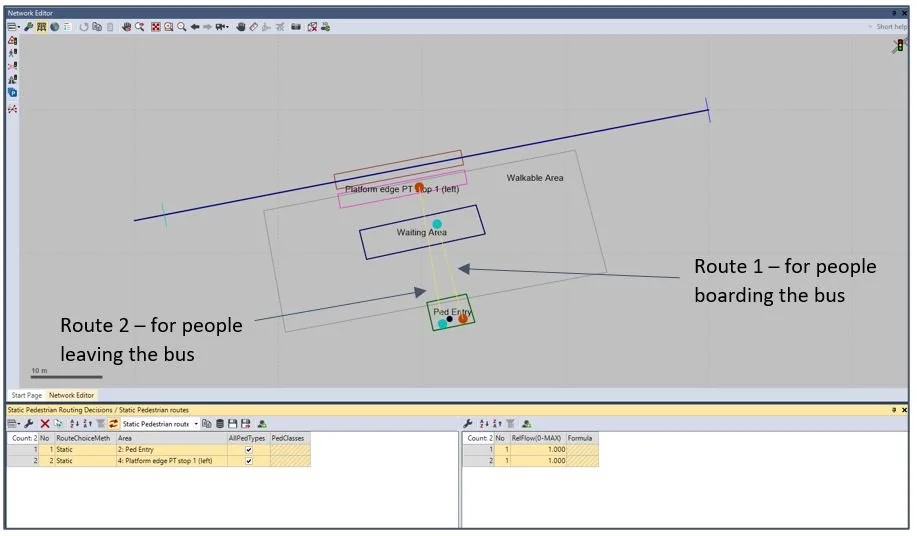
Figure 7 – Configuration of Pedestrian Routes
Step 3 – Configure the Bus Doors
Having set up the road and pedestrian elements, the next step is to configure the doors of the Bus 3D model. This is to allow the pedestrians to board and alight the Bus, both on the correct side and from the correct location on the bus.

Figure 8 – 2D/3D Model Segments – Door Configuration
The 2D/3D Model Segments menu can be found in Base Data. From here, you can choose Doors and configure the ‘Side’ and ‘Usage’ for each door as shown in Figure 8.
With the Doors for the Bus now set-up, the next step is to ensure the public transport stop is configured to match.
To do this, go to the Public Transport Lines list and choose ‘Line stops’ from the drop down menu. Then, using the right-hand side menu, double click on the stop to bring up the ‘PT Line Stop’ menu (see Figure 9).
From this menu, a range of options can be updated:
The alighting percentage (with numbers calculated from the occupancy defined in the PT Line ‘Departure Times’ menu.
The alighting composition
The alighting location
The door location and if boarding/alighting is possible.

Figure 9 – Configuration of Line Stop
Step 4 – Model Complete – Play model to check behaviour
The model is now complete. All that is left is to play the model to check that pedestrians board and alight the model as expected (see video below).
Troubleshooting
If when playing the model, the pedestrians wait but do not board the bus, you may need to move the Waiting area closer to the Platform edge to give the people a chance to reach the stop before the bus leaves.
Alternatively, you can change the ‘Door closure delay’ time in the Line Stop menu (see Figure 9) to a value greater than 3s, so that the bus waits for the people to reach the Platform edge.
Finishing Touches
Finally, to finish the model off, consider adding a number of display types for the road, path etc., add areas, 3D objects & obstacles (planting) and create a more visually pleasing model (see Figure 10).

Figure 10 – Higher Quality Model Output